Working for a bank, we developed a highly successful platform for their retail users. It boasted modern features, robust security practices, and an exceptional user experience. However, we faced a new challenge when the bank requested us to extend the same platform for their High Net Worth Individual (HNI) users. They believed that since most of the features were similar, there was no need for two separate software systems.
As a solution architect, I took on the challenge of converting the existing single tenant architecture to a multi-tenant software architecture. To begin with, I carefully examined the similarities and differences between both systems. I then documented the potential risks and identified appropriate solutions and measures to address them effectively. And once done, we started making the changes step by step.
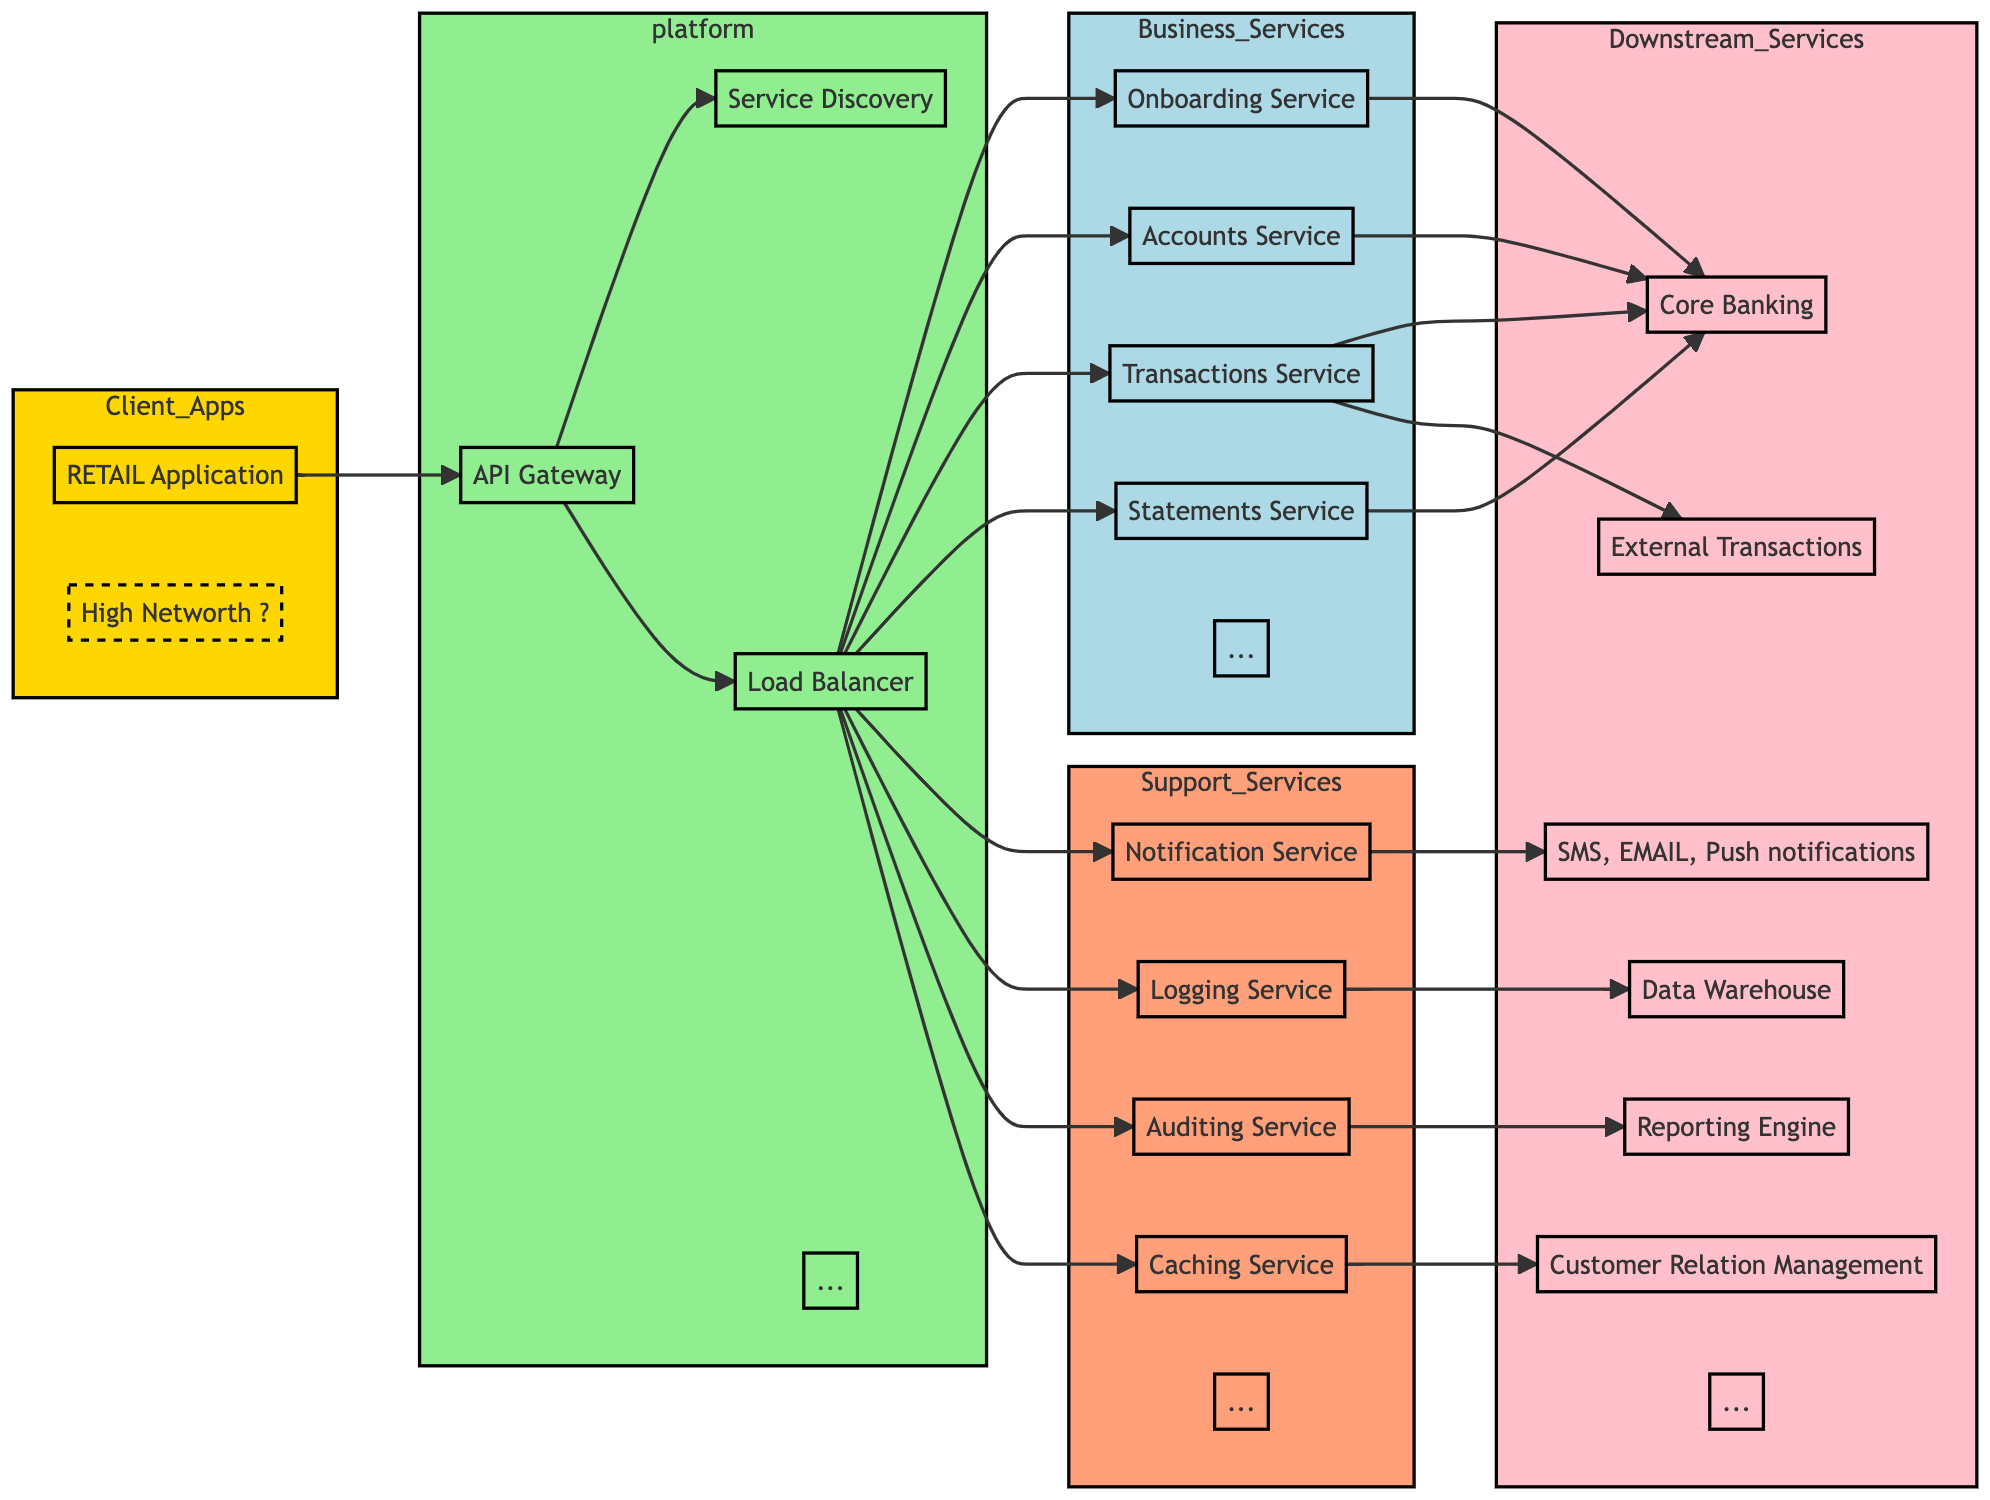
The first step was to make the existing layers start supporting a tenant id.
Step 1: Introduction of a tenant ID in the clients.
The first step in the conversion process involved introducing a tenant ID in the clients. This step was relatively straightforward as the mobile and web applications for the two tenants were already distinct. We accomplished this by introducing a tenant_id header. Each client application was responsible for determining which tenant it was serving. For example, the retail tenant was identified by the RETAIL value, while the HNI tenant was identified by the HNI value.
Step 2: Modification of services to accept the tenant ID header and logging confirmation.
In the second step, we made modifications to the services to ensure they could accept the tenant ID header. To verify that all APIs were aware of this header, we introduced a standardized log format: “REQUEST FOR TENANT: <TENANT_ID>”.
To confirm the successful implementation, we ran a test script and closely observed the logs. Through this process, we were able to validate that all APIs now supported the mentioned header and were properly logging the tenant ID in the desired format.
Step 3: Enhancement of domain objects to record tenant IDs.
In the third step, we enhanced the domain objects, including Request, Response, DTOs, and Entities, to start recording the tenant IDs. The default value for the tenant was set as RETAIL, considering it was the existing (and up until this point, the only) tenant for us.
By updating the domain objects, we ensured that the tenant ID was associated with the relevant data throughout the system, including the database. This allowed us to distinguish and manage the data specific to each tenant effectively.
Step 4: Modification of restClient and downstream API integration code.
In the fourth step, we made necessary modifications to our restClient and other downstream API integration code to start sending the tenant ID header to the downstream services. This ensured that the tenant context was propagated throughout the system.
Simultaneously, other teams were also working on enabling their services to utilize the tenant ID header, making their services multi-tenant compatible. This collaborative effort ensured that all services within the system were aligned and capable of handling multi-tenant functionality.
Step 5: Enhancement of configurations.
In the fifth step, we focused on enhancing the configurations. Firstly, we segregated the configurations for the service, separating the technical configurations from the functionality-specific configurations. This allowed for better organization and management of the configurations.
Next, we enhanced the business configurations to support multiple copies, each corresponding to a specific tenant. By doing so, we ensured that the correct configuration was picked up based on the provided tenant ID header. This enabled the system to dynamically adjust its behavior and functionality based on the tenant being served.
With these configuration enhancements, we achieved greater flexibility and adaptability in catering to the specific needs and requirements of each tenant within the multi-tenant architecture.
Step 6: Analysis of functional implementation and code refactoring.
In the sixth step, we conducted a thorough analysis of the functional differences between the two tenants. This phase presented the most complex challenges in transitioning to a multi-tenant architecture. Our approach involved carefully examining the codebase and implementing the following methods:
For cases where the two tenants required completely different implementations, we abstracted common code into a parent class and created separate implementations for each tenant. We leveraged Spring’s dependency injection (DI) feature to dynamically instantiate the appropriate implementation based on the input headers.
When functionality was specific to only one tenant, we introduced custom hookpoints. These hookpoints had empty implementations by default, but we provided specific implementations for the relevant tenants.
In some scenarios, we utilized extensions for certain DTOs and Entities. These extensions acted as wrappers around the base objects, and special tables were created to persist the additional columns required for the extensions.
Throughout this process, we also took the opportunity to address existing technical debts. The codebase had been developed over a period of time by individuals with varying backgrounds and experience levels. We viewed this as an opportunity to refactor the existing code wherever possible, resulting in the elimination of numerous technical debts.
In cases where methods could be reused without any impact, we left them untouched to ensure minimal disruption to the existing functionality.
Step 7: Thorough testing of auditing and reporting services for different tenants.
In the next step, we conducted comprehensive testing of our auditing and reporting services to ensure that accurate and appropriate reports were generated for each tenant.
During the testing phase, we verified that the auditing service captured the relevant data specific to each tenant, recording the necessary information for auditing purposes. We also ensured that the reporting service generated reports tailored to the requirements of each tenant, providing them with the specific insights and analytics they needed.
Once the multi-tenant platform was fully prepared, we introduced the second tenant for beta testing. During the beta phase, the second tenant operated on the platform for a couple of months. This period allowed us to gather valuable feedback, identify any minor bugs or issues, and make enhancements to improve the overall performance and user experience.
After addressing the initial bugs and incorporating the necessary enhancements, we proceeded to launch the platform for both tenants. Over time, any remaining minor bugs were diligently resolved, ensuring a stable and reliable experience for both tenants.
Today, our multi-tenant platform runs strong with numerous tenants, reducing the bank’s running and maintenance costs. By leveraging a single software platform for multiple tenants, the bank achieves economies of scale, optimizing resource utilization and streamlining processes. Updates and enhancements benefit all tenants simultaneously, saving time and costs. The multi-tenant architecture offers cost efficiency, scalability, and streamlined operations, driving greater savings while providing a reliable solution for clients.
Related Reading
- The Technology of Modern Banks — how the full banking technology stack fits together
- Digital Banking Modernization Case Study — multi-tenant patterns applied in a real transformation programme
- Understanding the Logging Architecture — observability across tenant boundaries
- Authenticating Services in a Microservices Environment — securing inter-service calls in a shared platform
Designing or scaling a multi-tenant banking platform?
I can help your team plan tenant isolation, governance, and rollout strategy without slowing delivery.